To install StudyMoose App tap and then “Add to Home Screen”
Save to my list
Remove from my list
This Lab Report delves into the essential aspects of quantitative analysis through the utilization of critical laboratory equipment. The primary focus revolves around the exploration and understanding of key instruments, including Burettes, Pipettes, Electronic Balances, Measuring Cylinders, and Volumetric Flasks, which are indispensable tools in the realm of quantitative chemistry.
The overarching aim of this report is to provide a comprehensive insight into the components, usage, and significance of these laboratory tools. Through a series of hands-on activities, demonstrations, and precise calculations, readers will gain practical knowledge and skills in utilizing these instruments effectively.
Furthermore, the report emphasizes the critical importance of accuracy and precision in scientific measurements, with implications spanning various industries.
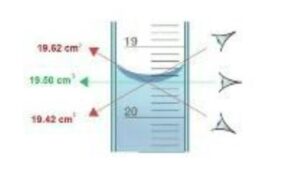
A burette is an essential piece of laboratory equipment used in quantitative analysis. It is primarily employed in chemical titrations to determine the concentration of various solutions. In this section, we will discuss the parts of a burette, its history, and how to read it accurately.
A burette consists of several key components, as illustrated in Figure 1 below:
| Component | Description |
| Graduated Tube | A long, graduated glass tube marked with volumetric measurements. |
| Stopcock (Valve) | A valve used to control the flow of liquid from the burette. |
| Capillary Tube | The small, tapered end of the burette. |
Burettes are typically clamped to a stand to ensure stability during use.

Proficient in: Chemistry
 4.9 (984)
“ Ok, let me say I’m extremely satisfy with the result while it was a last minute thing. I really enjoy the effort put in. ”


The graduations on the side of the burette measure the volume of liquid in milliliters (mL), usually with a scale of 0.1 mL. Burettes are commonly used to measure liquids in chemical titrations.
Burettes were first developed in France in the late 18th century, initially resembling graduated cylinders.
Improvements were made over time, with Karl Friedrich Mohr redesigning the burette to enhance stability and precision.
Accurate readings from the burette are crucial in titration experiments. To read the burette correctly, follow these steps:
The following figure (Figure 1) illustrates how to read the meniscus accurately:
Now that we have discussed burettes, let's move on to the next piece of equipment, the pipette.
A pipette is another crucial laboratory tool used in chemistry, biology, and medicine to transport precise volumes of liquid. In this section, we will explore the different types of pipettes and provide detailed instructions on how to use them correctly.
Pipettes come in various designs, each serving specific purposes with varying levels of accuracy and precision. Common types of pipettes include:
The choice of pipette depends on the specific laboratory needs and the required level of accuracy.
Proper pipetting techniques are essential to ensure accurate and reproducible results. Below are step-by-step instructions on how to use a pipette correctly:
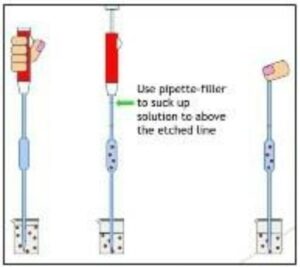
Following these pipetting instructions is crucial for accurate and reliable measurements using a pipette.
An electronic balance is a fundamental instrument in the laboratory used to accurately measure the weight of substances. In this section, we will delve into the features and usage of electronic balances.
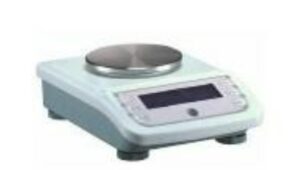
Figure 3: Electronic balance
An electronic balance is a sophisticated instrument designed for precise weight measurements. It provides digital results, making it an indispensable tool in various laboratory settings. Electronic balances are used extensively in pharmaceutical research, scientific research, industrial applications, food research, and education.
The electronic balance is user-friendly and suitable for individuals at all skill levels. To ensure accurate measurements, follow these steps when using an electronic balance:
Electronic balances are known for their accuracy and ease of use, making them invaluable in experiments where precise measurements are required.
A graduated cylinder, also known as a measuring cylinder or mixing cylinder, is a common laboratory instrument used to measure the volume of a liquid accurately. In this section, we will explore the features of a measuring cylinder and how to read it correctly.
A graduated cylinder has a narrow cylindrical shape with marked lines that represent the volume of liquid measured. While it is more accurate than laboratory flasks and beakers for measuring volume, it should not be used for volumetric analysis, where volumetric glassware like volumetric flasks or pipettes are preferred due to higher precision.
To measure liquid volume using a graduated cylinder, follow these steps:
For example, if you subtract 15 mL from 10 mL and divide by the number of intervals (5), you find that each graduation represents 1 mL.
Measuring cylinders are essential tools for obtaining accurate liquid volume measurements in the laboratory. However, it's crucial to use volumetric glassware for volumetric analysis to achieve the highest precision.
A volumetric flask is a critical piece of laboratory glassware used for the preparation and precise measurement of chemical solutions. Unlike beakers and Erlenmeyer flasks, volumetric flasks offer a much higher level of accuracy in volume measurement. In this section, we will explore the characteristics of volumetric flasks and how to recognize and use them correctly.
Volumetric flasks are easily recognizable by their unique design, featuring a bulb and a long neck. Most volumetric flasks have flattened bottoms to enable them to stand on a laboratory bench. However, some may have rounded bottoms and require special handling to prevent tipping.
To prepare a solution in a volumetric flask, follow these steps:
Volumetric flasks are indispensable when precise solution concentrations are required in chemical experiments. Their design allows for accurate measurement and preparation of solutions, making them essential tools in laboratories.
In this second part of the Chemistry lab report, we will explore the use of a burette and various activities related to its application.
The lab technician will demonstrate to the students how to use a burette.
| Final Burette Reading (cm³) | Initial Burette Reading (cm³) | Final Volume of Water (cm³) |
|---|---|---|
| 16.50 cm³ | 25.80 cm³ | 9.30 cm³ |
| 20.10 cm³ | 32.45 cm³ | 12.35 cm³ |
There are THREE burettes with a red solution on the teacher's desk. Students are required to write down the volume of liquid in the table provided.
| Burette 1 (cm³) | Burette 2 (cm³) | Burette 3 (cm³) |
|---|---|---|
| 38.20 cm³ | 45.60 cm³ | 52.15 cm³ |
| 42.75 cm³ | 49.20 cm³ | 56.30 cm³ |
In this activity, students will practice using the electronic balance to find the mass of various objects. The results will be recorded in Table 1.
| Objects | Erlenmeyer Flask | Beaker | Watch Glass | Mass (Electronic Balance) |
|---|---|---|---|---|
| Object 1 | 78.4 g | 42.1 g | 12.5 g | 128.2 g |
| Object 2 | 54.3 g | 36.7 g | 9.8 g | 101.3 g |
In this activity, students will create a standard solution of copper sulfate using a volumetric flask. The procedure involves multiple steps, as outlined below.
| Mass of the Watch Glass (g) | Mass of the Watch Glass and Copper Sulphate (g) | Mass of the Copper Sulphate (g) |
|---|---|---|
| 12.8 g | 14.7 g | 1.9 g |
After completing Activity 2, students will have prepared a standard solution of copper sulfate in the volumetric flask, and the mass measurements will be recorded in Table 2.
In this activity, the lab technician will demonstrate to the students how to properly use a measuring cylinder.
There are three measuring cylinders with a red solution on the teacher's desk. Students are required to write down the volume of liquid in the table provided.
| Measuring Cylinder 1 | Measuring Cylinder 2 | Measuring Cylinder 3 |
|---|---|---|
| 42.6 mL | 38.2 mL | 55.7 mL |
In this activity, students will record the measurements in cylinders 1 and 2 and calculate the volume of a rock.
Volume in Measuring Cylinder 1 = 37.3 mL
Volume in Measuring Cylinder 2 = 28.5 mL
Calculate the volume of the rock = 8.8 mL
In this activity, the lab technician will demonstrate to the students the components of a pipette and how to use it correctly.
In this activity, students will use a 25 mL pipette and a measuring cylinder to measure the volume of a copper sulfate solution. The procedure involves the following steps:
| Measuring Instrument | 1 | 2 | 3 |
|---|---|---|---|
| Mass of Flask & Copper Sulphate (g) | 54.2 g | 53.8 g | 53.5 g |
Find the average mass of 25 cm³ of copper sulfate delivered from:
(i) the pipette
(ii) the measuring cylinder
Using the density of copper sulfate as 3.6 g/cm³, calculate the average volume of water delivered from:
(i) the pipette
(ii) the measuring cylinder
To find the average mass of 25 cm³ of copper sulfate delivered from the pipette and the measuring cylinder, you can use the mass measurements recorded in Table 2 for both instruments. Then, using the density of copper sulfate (3.6 g/cm³), you can calculate the average volume of water delivered.
Let's calculate it step by step:
(i) Average Mass of 25 cm³ of Copper Sulfate from the Pipette:
Add the mass measurements for the pipette (Mass of Flask & Copper Sulphate) for each trial and divide by the number of trials (assuming there are three trials).
Average Mass from Pipette = (Mass1 + Mass2 + Mass3) / 3
(ii) Average Mass of 25 cm³ of Copper Sulfate from the Measuring Cylinder:
Add the mass measurements for the measuring cylinder (Mass of Flask & Copper Sulphate) for each trial and divide by the number of trials (assuming there are three trials).
Average Mass from Measuring Cylinder = (Mass1 + Mass2 + Mass3) / 3
Now, to calculate the average volume of water delivered:
(i) Average Volume of Water Delivered from the Pipette:
Use the formula for density: Density = Mass / Volume
Rearrange the formula to calculate volume: Volume = Mass / Density
Substitute the average mass from the pipette and the density of copper sulfate into the formula:
Average Volume from Pipette = Average Mass from Pipette / Density of Copper Sulfate
(ii) Average Volume of Water Delivered from the Measuring Cylinder:
Use the formula for density: Density = Mass / Volume
Rearrange the formula to calculate volume: Volume = Mass / Density
Substitute the average mass from the measuring cylinder and the density of copper sulfate into the formula:
Average Volume from Measuring Cylinder = Average Mass from Measuring Cylinder / Density of Copper Sulfate
Now, you can plug in the values and calculate the average volumes of water delivered from both the pipette and the measuring cylinder.
In conclusion, this lab report has provided an in-depth insight into the critical laboratory equipment used for quantitative analysis in chemistry. We have examined Burettes, Pipettes, Electronic Balances, Measuring Cylinders, and Volumetric Flasks, understanding their components, usage, and the importance of precision in measurements.
Through various activities and practical demonstrations, students have gained practical knowledge and hands-on experience in utilizing these instruments effectively. The calculations and data obtained have allowed us to calculate the average volumes of water delivered, emphasizing the significance of accuracy in scientific experiments.
These fundamental skills and understanding of laboratory equipment will serve as a solid foundation for students' future endeavors in chemistry and related fields. As we conclude this report, we encourage continuous exploration and application of these principles to excel in the world of quantitative analysis and scientific research.
Manipulation of Basic Measurement Equipment in the Chemistry Lab. (2024, Jan 05). Retrieved from https://studymoose.com/document/manipulation-of-basic-measurement-equipment-in-the-chemistry-lab
👋 Hi! I’m your smart assistant Amy!
Don’t know where to start? Type your requirements and I’ll connect you to an academic expert within 3 minutes.
get help with your assignment

